

Scrivener for iPad and iPhone is meant to work both independently and in conjunction with Scrivener for Mac or Windows. You can create projects, write, edit, and compile on your iPad or iPhone, but you can also sync projects between your mobile device and desktop computer so you can work on both devices.
If you want to sync projects between devices, there are two ways to do so. You can use iTunes (on Windows) or the Finder (on Mac) to copy projects to and from your mobile devices. Or you can use Dropbox to sync your projects as you work on them.
In this article, I’ll look at both of these methods, and explain the pros and cons of each one.
About iTunes or Finder file sync
iTunes has long had the capability to copy files to and from apps, as long as those apps are configured to use iTunes File Sharing. If you’re running Windows, you’ll be able to use iTunes for this; if you’re on a Mac, you’ll have iTunes if you’re running macOS 10.15 Catalina or earlier. Later versions of macOS split iTunes into several apps, and these features are available in the Finder. In the rest of this section, when I discuss iTunes, I mean both of these methods. The screen you see when transferring files is the same.
In the early days of the iPhone and iPad, the only way to sync content from a computer to a mobile device was by using iTunes. Over the years, Apple introduced features such as iCloud, which syncs contacts, calendars, reminders, and notes; Apple Music, which lets you store your music library in the cloud; the TV app, which allows you to access all the content you have purchased or rented from Apple’s stores; the Books app, which syncs ebooks and audiobooks; etc. Many people no longer sync these devices at all. There is also iCloud Drive, which allows you to sync files across all your devices.
But some files don’t sync easily using Apple’s cloud storage. In fact, I want to give a warning here about using Scrivener with iCloud Drive. In this article, I discussed syncing Scrivener files between two computers, and discussed issues with various cloud storage servers. iCloud Drive is a special case, because of the way it works with Scrivener projects. Since Scrivener projects are made up of many files, iCloud Drive, especially on mobile devices, won’t necessarily download all the files in a project, so you may end up with corrupted projects.
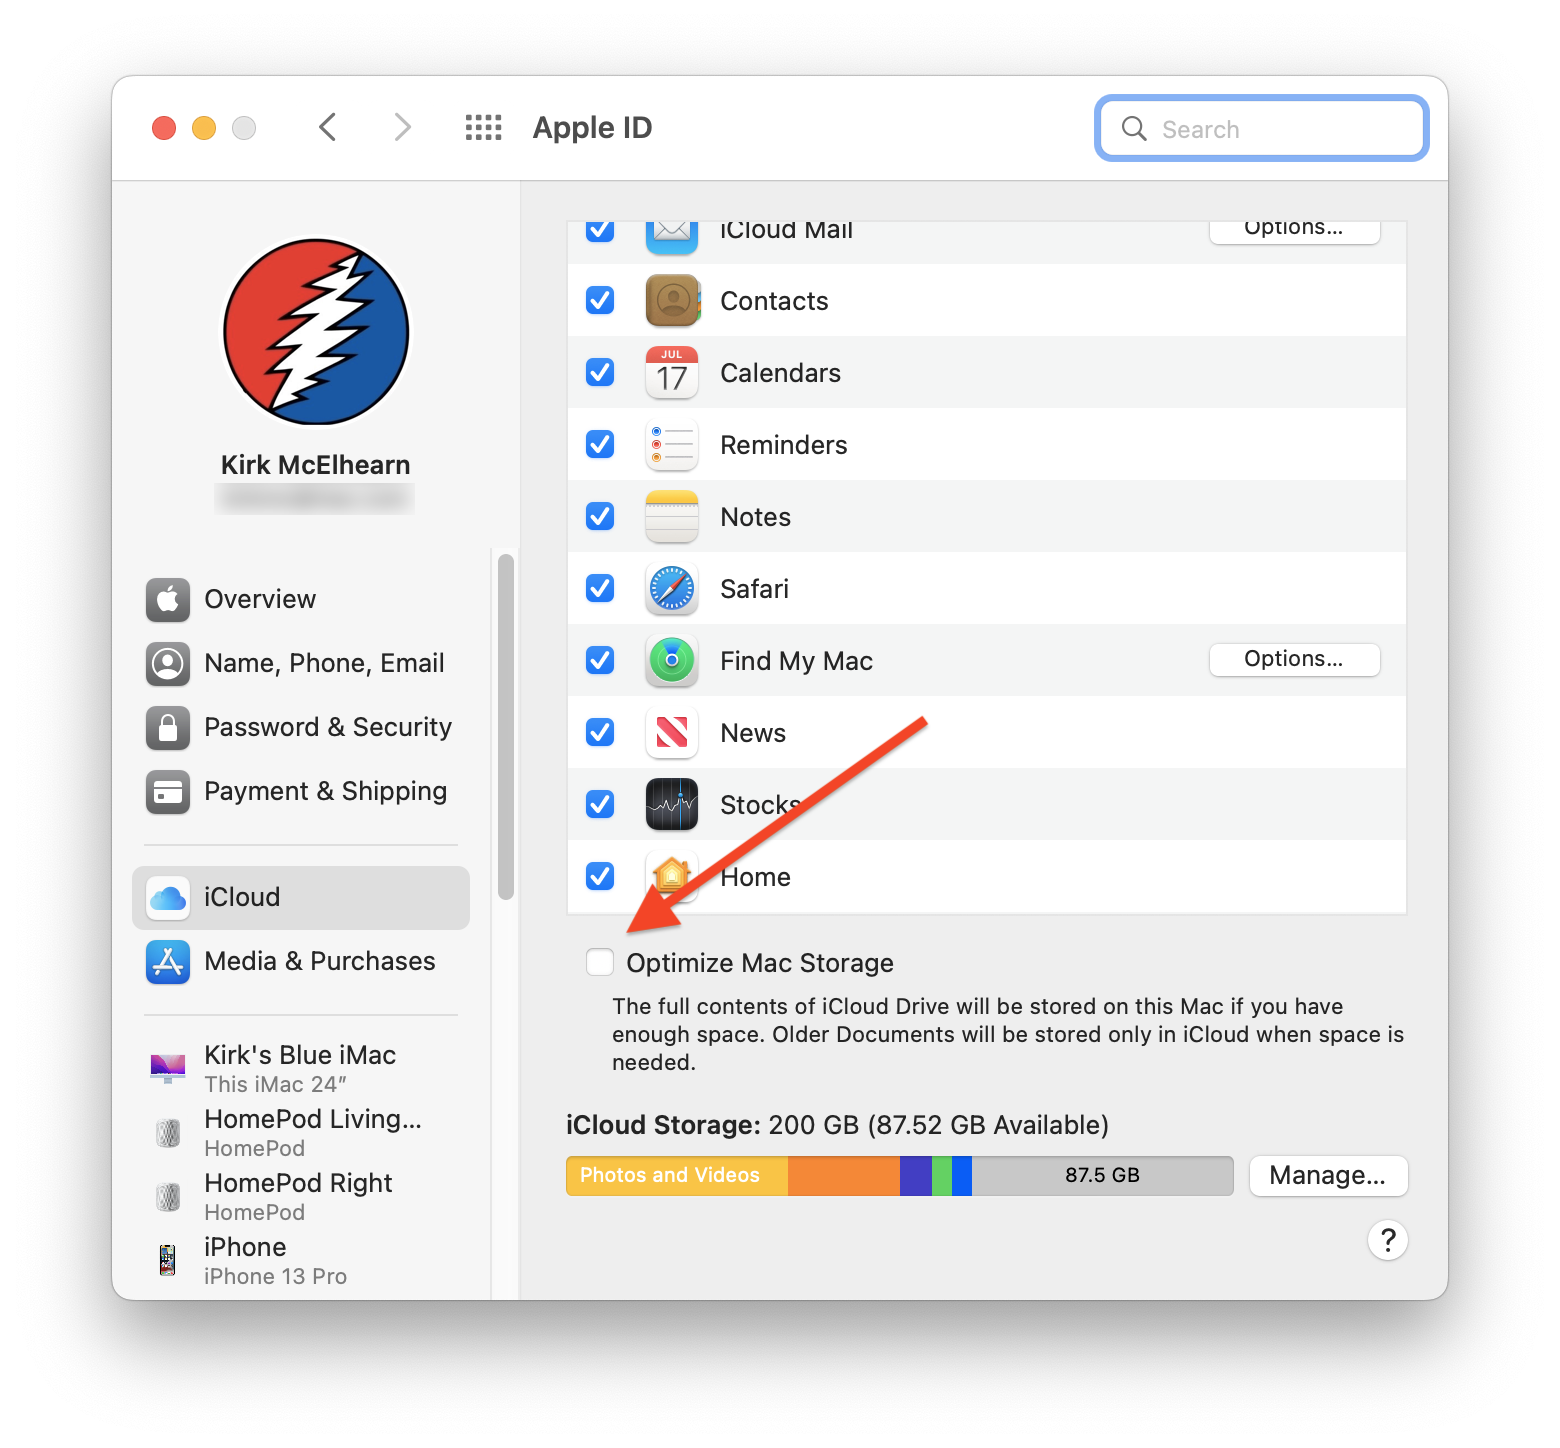
And even on the Mac there are risks; make sure you don’t enable Optimize Mac Storage in the iCloud settings on your Mac (System Preferences > Apple ID). In short, we don’t recommend using iCloud Drive at all.
 How to copy files to and from mobile devices with iTunes
When using this method, you don’t really “sync” files; you copy them from your mobile device to your computer, and vice versa. Here’s how.
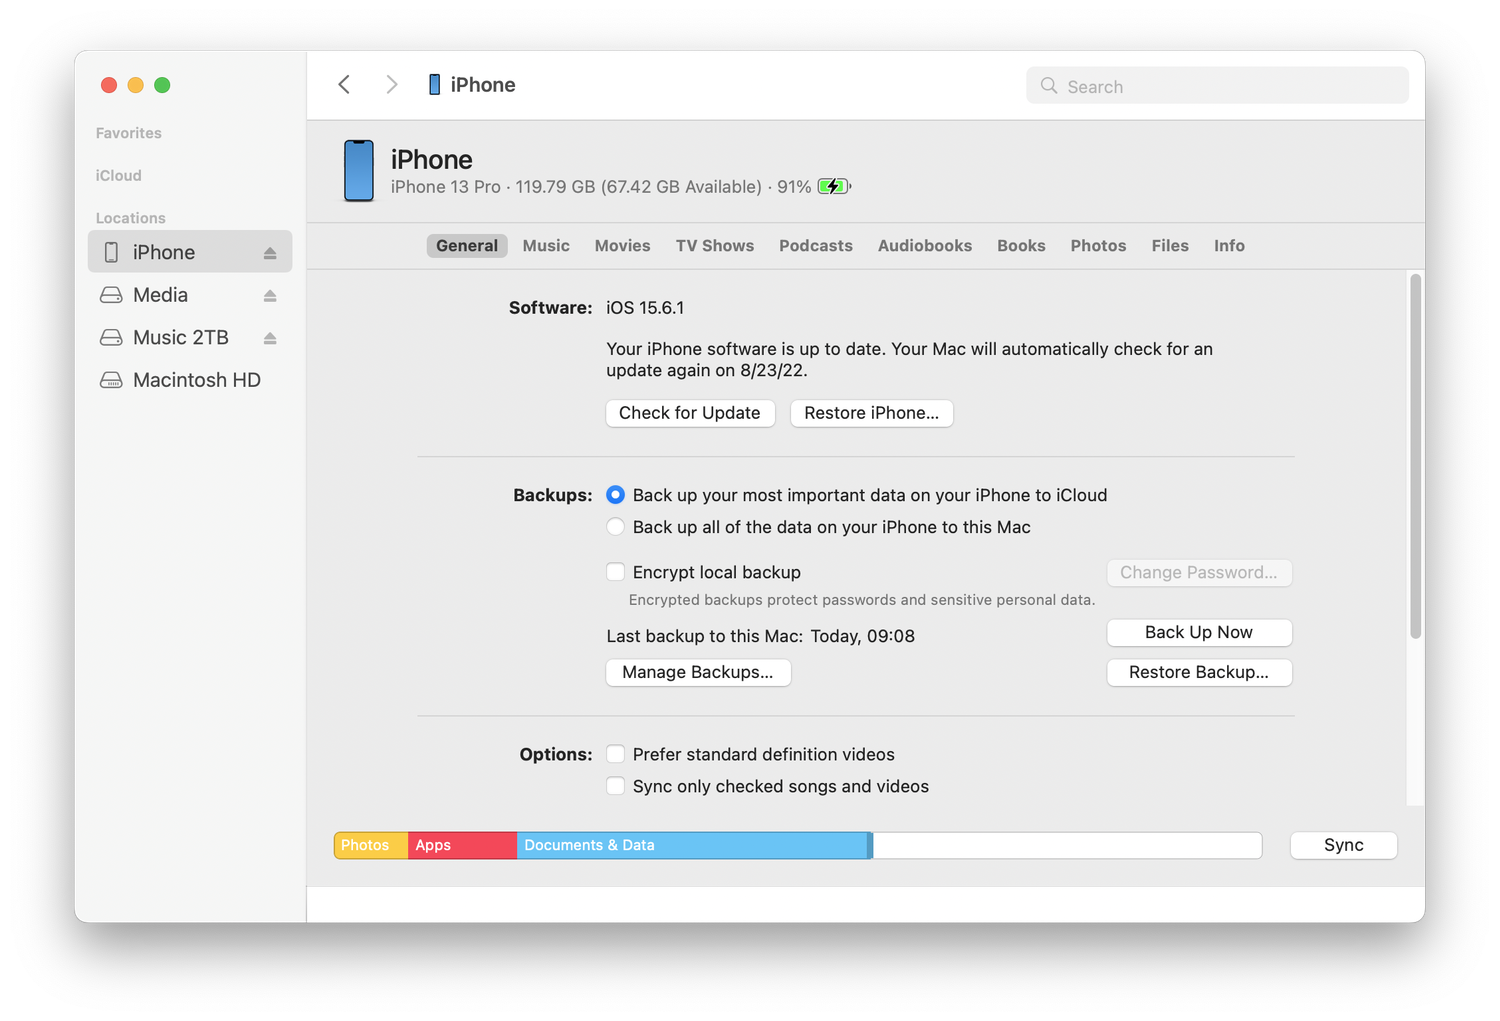
Connect your iPhone or iPad to your computer with a USB to lightning cable. If you sync your device regularly, and use wi-fi sync, you won’t need to do this. Find the device in the iTunes or Finder sidebar; click its icon.
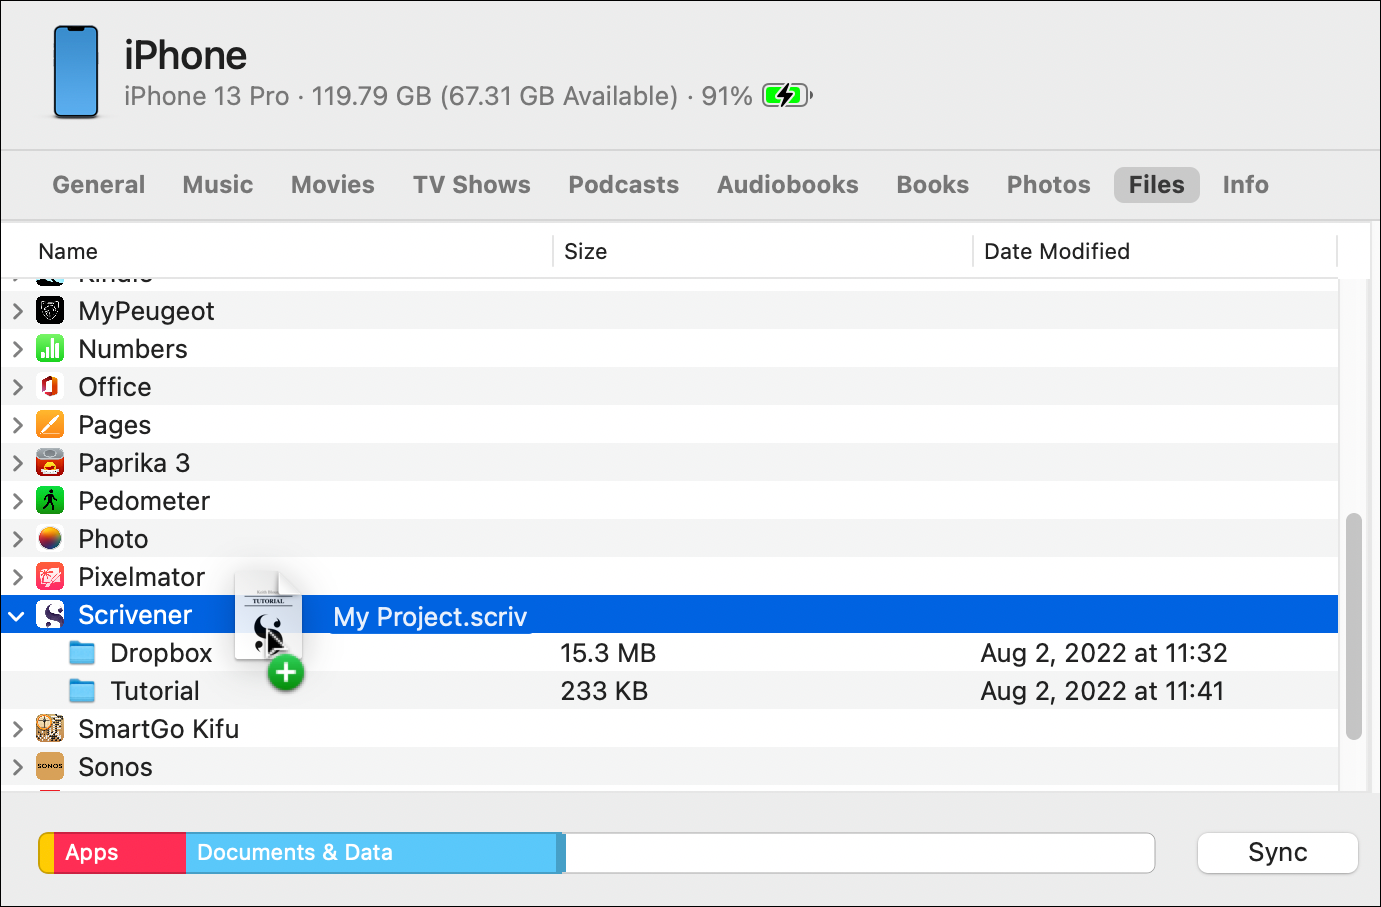
Click the Files tab, then click the > next to Scrivener to see the files the app contains. In the example below, there’s a Dropbox folder (I explain Dropbox syncing below) and a Tutorial folder. That contains the interactive tutorial that you can access in Scrivener for iPad or iPhone.
To copy one of these folders to your computer, just drag it to the Finder or to the Windows Explorer. If you open the folder, you’ll see your Scrivener project, and you can work with it on your computer.
To add a project to Scrivener for iPad or iPhone, drag it from the Finder or Windows explorer onto the Scrivener entry in the app list. This will take a few seconds or a few minutes depending on the size of the project; you don’t need to click Sync for the copy to occur. Note that you must make sure that your iPad or iPhone has enough storage for your project, especially if it is a large project with lots of research files.
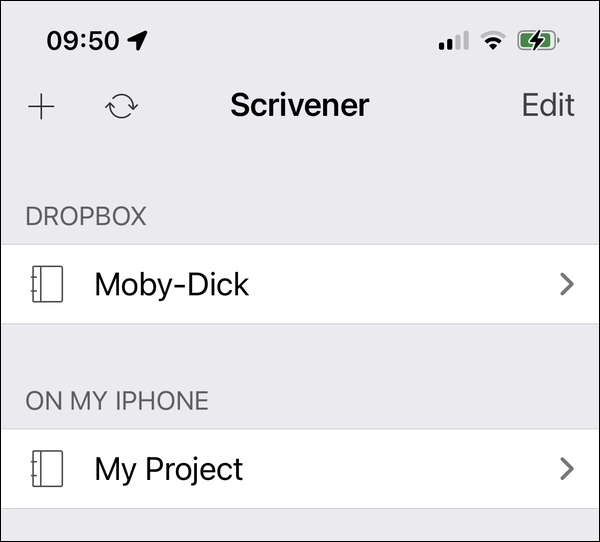
When you open Scrivener, you’ll see the project you just copied in the On My iPhone or On My iPad section.
The above procedure is quite simple, but you need to be careful. If you copy a project from your mobile device to your computer, then make changes, you can copy it back to the mobile device. But when you do so, it will overwrite the file on the device without warning. It’s a good idea to name each project file on your computer when you make changes; for example, My Project 22-08-29. Also, you might want to keep the various versions you’ve copied from your mobile device on your computer as backups; this ensure that if you accidentally overwrite a project you still have a copy.
How to sync with Dropbox
Dropbox is a cloud storage service, which offers a free tier (2 GB) and paid tiers (2 TB or more). The free plan may be sufficient if you just use it for your Scrivener projects, but it is limited to three devices (Scrivener doesn’t count as a device). If you only have, say, a desktop computer, a laptop, and a tablet, then the free plan will work for you. But if you have more devices, and you want to use Dropbox on them, you’ll have to pay at least $10 a month. This said, Dropbox is extremely reliable, and it’s the only cloud storage service that is fully compatible with Scrivener. As such, Dropbox support is baked into Scrivener for iPad and iPhone. (See this article for more on syncing projects to the cloud from computers, as well as some remarks about other cloud storage services.)
Syncing with Dropbox is easy, but it is important to be aware that this syncing is not automatic; syncing only occurs when you have finished working on a project, or when you tell Scrivener to sync your files, depending on the settings you choose.
To set up Dropbox syncing on Scrivener for iPad or iPhone, if you have the Dropbox app installed, you must be logged into your account. If you don’t have the app installed, you’ll see a login screen within the Scrivener app. You also need to install the Dropbox app on your Mac or PC to sync files to and from your computer.
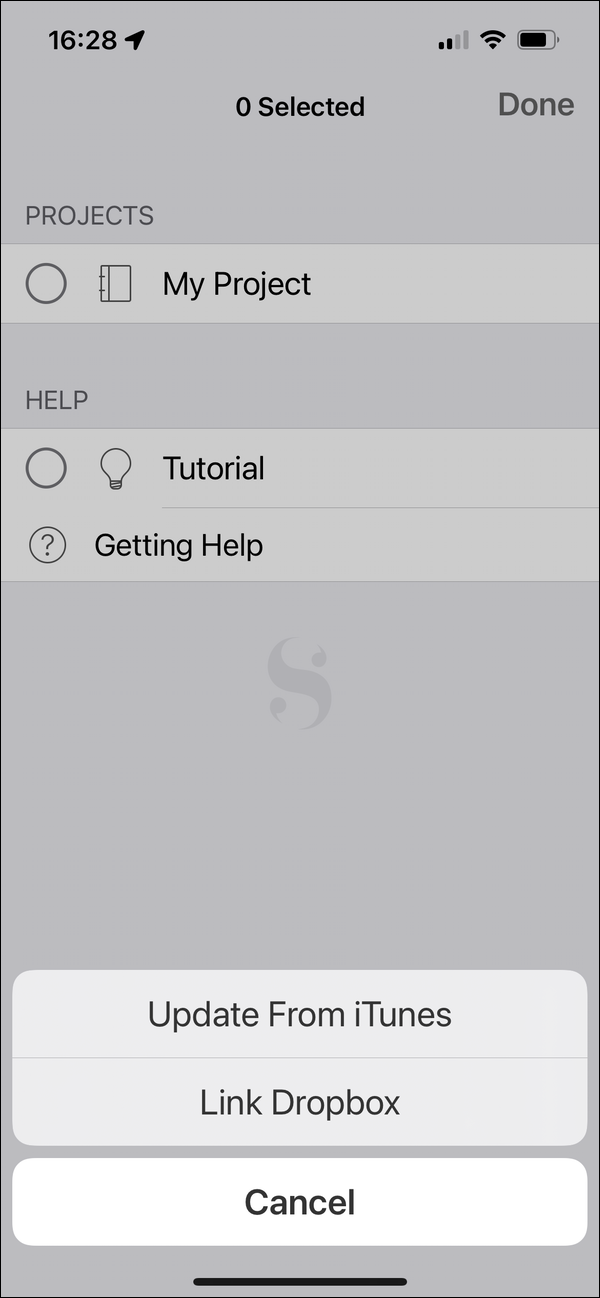
From the main screen of Scrivener – I’m using the iPhone app for these examples – tap Edit, tap the Gear icon, then tap Link Dropbox.
The Dropbox app opens, asking you to allow Scrivener to access files and folders it manages. Tap Allow, then choose a folder. You can choose to store your Scrivener projects in Dropbox’s Apps/Scrivener folder, or you can choose any other folder in your Dropbox.
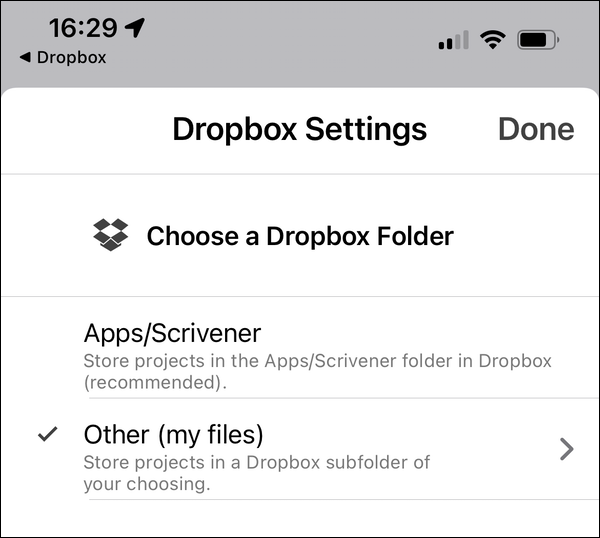
After you’ve chosen a folder, tap Done.
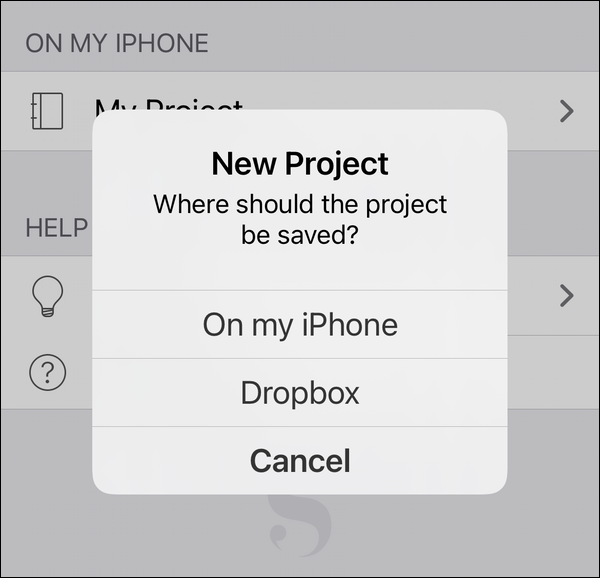
You’ll now see an empty Dropbox section on the main screen of the Scrivener app. If you tap Edit, you can drag any projects on your device to Dropbox, or you can create a new project by tapping +. When you do this, and enter a name for the project, a dialog asks where you want to save it: On my iPhone or Dropbox. Tap the latter to save the project to Dropbox.
Now, with the project in your Dropbox folder, it is not only available to sync to other devices, but it also serves as a backup. (Sort of; it’s not really a backup because it can be deleted, but if you back up your Mac or PC regularly, your Dropbox folder will get backed up.)
You can also now put projects into the Dropbox folder on your Mac or PC, so you can access them on your mobile devices. Make sure to put these projects in the folder you selected above. On a Mac or PC, syncing occurs automatically, if the Dropbox app is running.
When you work on a project, and want to sync it, go back to the main Scrivener screen which lists your project, then click the sync icon at the top of the screen.
Dropbox sync settings for Scrivener
Scrivener does not sync your projects to Dropbox while you work. There are some settings that can make Dropbox syncing a bit easier. Go to Settings > Scrivener, then tap Syncing & Sharing. If you toggle Auto-Detect Changes, Scrivener will sync your projects when you close them, if it has detected changes; that is, when you go back to the main screen that lists projects.
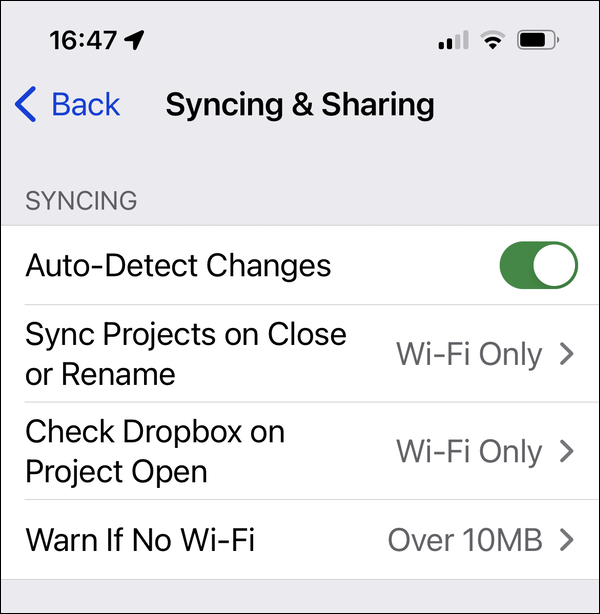
You can choose whether syncing projects on close or rename takes place Never, Wi-Fi Only, or Always. There is a similar setting to allow Scrivener to check Dropbox when you open a project. And Scrivener can give you a warning if you are not on wi-fi and your project is more than 10 MB, Never, or Always. This is because mobile data can be expensive, and if you sync often, you’ll be sending the same files over and over to Dropbox.
With these options, you can sync files easily from your computer to your mobile devices so you can write anywhere. I’ve not gone into much detail about Dropbox syncing, and there’s a Scrivener support document that looks more closely at how this works (though you probably don’t need to know more) as well as offering solutions if you have a problem.