

When it’s time to convert your Scrivener project to an ebook file, you can do this with a few clicks.
When you’ve finished writing a book in Scrivener, it’s time to compile it. This means that you tell Scrivener how to paste everything together to create a final file that you send to beta readers, or to an agent or editor, or even for yourself, to proofread. You can also compile your Scrivener project as an ebook; if you are self-publishing your books, this is how you create the final files that you upload to retailers.
In this article, we’ll look at how you compile your Scrivener project to an ebook.
Compile basics
Compiling a Scrivener project is fairly simple, though there can be lots of options if you want to tweak the way your exported file looks. We discussed the basic principles of compiling Scrivener projects in Compiling Your Scrivener Project: The Basics. If you’re not creating an ebook, you generally won’t need to use the more advanced compile features, but it’s good to be aware of what options you have.
Compiling ebooks
Scrivener has a number of built-in compile formats. If you choose File > Compile, you can choose the type of file you want to export from the Compile For menu. For ebooks, choose ePub Ebook; even Amazon has switched to ePub as its preferred format, and is deprecating the older .mobi format. (If you do need to compile to .mobi, there is an option in the Compile For menu.)
After you select the above, click Ebook in the Format sidebar; you see something like this:

In Using Section Layouts to Compile Your Scrivener Project, we explained how section layouts allow you to style the different elements of your project when you compile. In most cases, you can use the preset section layouts; if you click the popup menu in the Section Type column at the right of the window, you’ll see that, by default, the sections are set to Structure Based. This means that folders are chapters, and files within folder are scenes. You could have one file or dozens, in a folder, and, with Structure Based section layouts, they all get pasted together in chapters when compiled. It’s easiest to set up your book in this manner. If you haven’t written your project with folders for each chapter, it can be practical to change the structure in the Binder to reflect this.
Adding front and back matter to your ebooks
When you publish an ebook, you need front and back matter. Front matter includes such things as a title page, the author’s name, copyright information, and may include a dedication, acknowledgments, and a forward, preface, or introduction. Back matter varies a lot according to the type of book. In some cases, there is no back matter, or simply information about the author. In others, there is an afterword, an appendix, notes, an index, a glossary, bibliography, and more.
You can add front and back matter to your ebook when you compile by checking the Add Front Matter and Add Back Matter options at the bottom right of the Compile dialog, and selecting which files contain front and back matter. See How to Use Front and Back Matter when You Compile Your Scrivener Projects to learn how to set up front and back matter in the Binder.
Adding metadata to your ebook
If you click the second icon above the right-hand column in the Compile dialog, you can enter metadata about your book. Scrivener takes the title and author from your project information, but you can change it here, or add it if necessary. You can add other metadata, such as any contributors, subjects – keywords that may help people find your book on ebook retailer websites – and a description of the book.
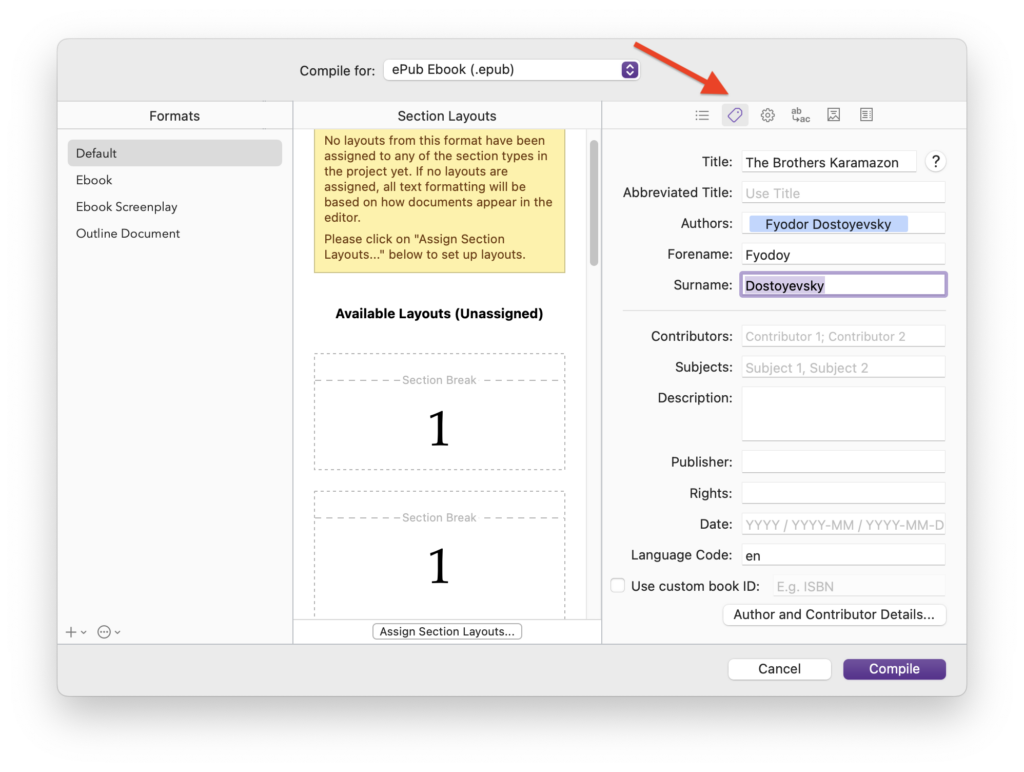
You should enter the publisher’s name, if you are self-publishing; this is either your name or your business’s name. Enter a publication date, a language code, and, if you have an ISBN, check Use custom book ID and enter it there.
Setting compile options
The next button above the right-hand column is Options. A few options are enabled here by default, such as Remove comments and Remove annotations. Go through the rest of the options to see if there’s anything else you need to remove, such as highlighting, text colors, and struck-through text.
Replacing text when compiling
Scrivener can perform automatic text replacements when compiling. This is a way to replace shorthand you have used in your project, such as abbreviations you used to not have to type out long names over and over. If you do want to make replacements at this stage, you should ensure that you have a list of all the terms you’ll be replacing so none of your abbreviations or placeholders end up in your final document.
Adding a cover to your ebook
You probably want to add a cover to your ebook. This is easy to do when you compile. Add your cover image anywhere in your Binder (not in the Manuscript or Draft folder), then click the Cover icon at the top of the right-hand column in the Compile dialog. Click the Cover Image menu, and select the image. Scrivener adds this at the front of the file when it compiles your project.

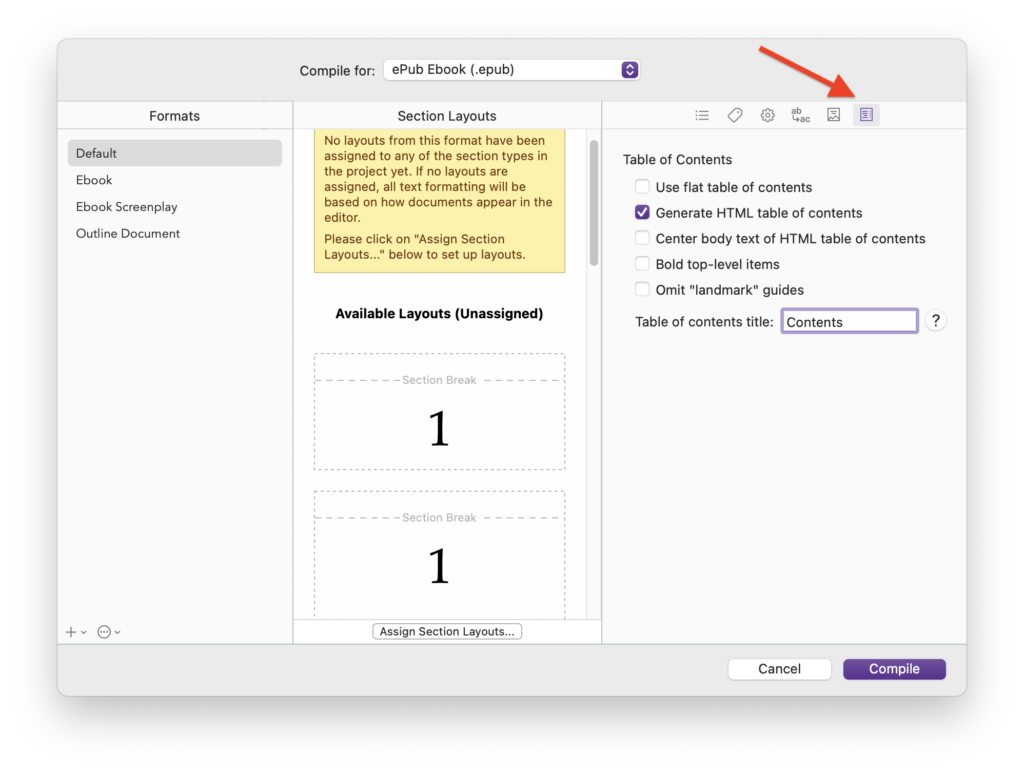
Adding a table of contents to your ebook
Finally, you can add a table of contents to your ebook when compiling. To do this, click the final tab above the right-hand column of the Compile dialog. In most cases, you want to generate an HTML table of contents, so readers can tap or click items in the table of contents, and use ebook reader navigation to go to chapters. Most people will want the table of contents to be called Contents, but you can change that name.
There are plenty of options under the hood in the various tabs in the Compile dialog. Chapter 23 of the Scrivener manual goes into great detail on the compile process, and section 23.4 discusses all the settings available when compiling.
Kirk McElhearn is a writer, podcaster, and photographer. He is the author of Take Control of Scrivener, and host of the podcast Write Now with Scrivener.