Learn how to use images for chapter titles in your compiled books.
This is part of a planned series of in-depth blog posts that takes a real-world user query and turns it into a follow-along. We’ll start with a problem, provide a sample project, and walk through the solution, showing you some tips and tricks for using Scrivener along the way. These follow-alongs assume that you have a working knowledge of Scrivener and have at least been through the interactive tutorial project.
Getting Started
Let’s start with a sample project. To follow along, download the project by clicking the link below:
Open the project in Scrivener 3 for macOS and take a look at how it’s set up. Note:
- The project was created from the “Novel” template.
- It contains three chapters, each represented by a folder (“My First Chapter”, “My Second Chapter”, “My Third Chapter”).
- There is a “Chapter Images” folder in the binder that contains the images I want to use as the heading in each chapter. (Click on the images in the binder to view them.) These are images I created in an image editor and then imported into my project.
First, let’s try compiling to see what we are starting with:
- Go to File > Compile… (Note that “Ebook” is selected as the Compile format in the sidebar and “ePub 3” is selected next to “Compile for”.)
- Click “Compile”.
- Tick “Open compiled document in” at the bottom of the export panel and make sure “iBooks” is selected.
- Click “Export”. The compiled ebook will open in iBooks.
The book looks good, except that at the moment, it’s not using our chapter heading images. For that, we are going to create our own custom Compile Format based on the “Ebook” format, and create a new Section Layout that adds in the images. First, though, we need a way of telling Scrivener which image should be associated with each chapter.
Associating Images with Chapters
We’re going to use custom metadata for this:
- In the main menu, go to Project > Project Settings…
- Select “Custom Metadata” in the Project Settings sidebar.
- Click “+” on the top right to add a new metadata field.
- Name the field “Image”.
- Click “OK”.
We’ve now created a new “Image” metadata field for documents in the project which we can use to assign our images. Next, let’s assign the three chapter heading images to the relevant chapters:
- Select “My First Chapter” in the binder.
- Switch the Metadata pane of the Inspector (the tag icon at the top).
- Expand the “Custom Metadata” Inspector area.
- Type “ChapterOne” into the “Image” field – the name of the image we want associated with this chapter.
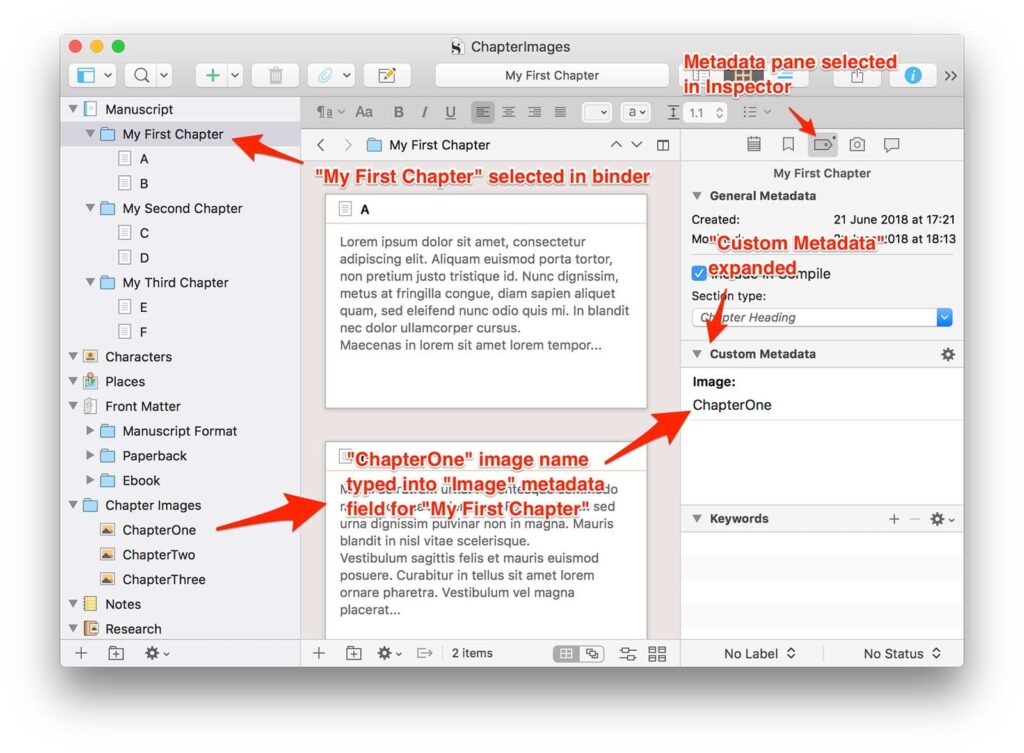
We then just need to repeat this for the other two chapters:
- Select “My Second Chapter” in the binder.
- Type “ChapterTwo” into the “Image” metadata field (“ChapterTwo” being the name of the image we want to use for this chapter).
- Select “My Third Chapter” in the binder.
- Type “ChapterThree” into the “Image” metadata field.
Now each chapter “knows” which image is associated with it. Of course, it doesn’t really know – it just has a piece of metadata associated with it containing the image name. At the moment, this does nothing. We now need to create a Compile Format that will use this information.
Creating a Custom Compile Format
Now our project is set up, let’s go about creating a custom Compile Format. In this follow-along, we’re going to build our Compile Format based on the “Ebook” format so that we can create ePub and Kindle files using images for chapter titles, but you can use exactly the same technique to use images for chapter titles in PDF files, Word files or anything else.
- Go to File > Compile…
- Ctrl-click on “Ebook” in the Formats list on the left and select “Duplicate & Edit Format…” from the contextual menu. This will cause Compile to switch to the Format editor.
- At the top, next to “Format Name”, let’s give our new format a meaningful name – let’s name it “Stylish Ebook”.
- Ensure “Section Layouts” is selected in the list on the left.
- Select “Chapter Heading” on the right – we do this because this is the Section
- Layout that is closest to what we want.
- Click “+” in the top-right to create a new Section Layout. The new Layout will copy the “Chapter Heading” settings since that was selected.
- Name the new layout “Chapter Heading Image”.
- Select the “Title Options” tab in the middle of the window.
- Where it says “Chapter <$t:chapter>” in the “Title Prefix” area, delete the text and replace it with “<$img:<$custom:Image>>” (without the speechmarks).
- Keep the return character after it, though.
- Beneath the “Title Prefix” area, next to where it says “Case:”, change the setting from “Uppercase” to “Normal”.
This is how things should look:
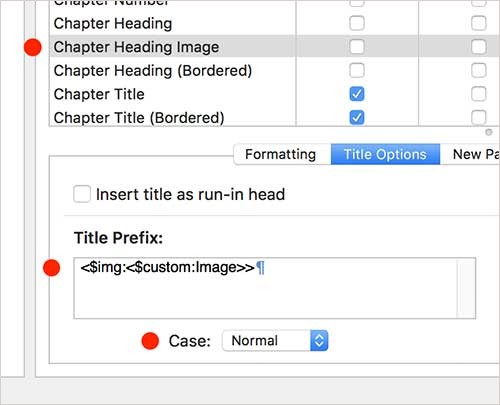
What did we just do?
Before we test this, let’s look at what we just did:
- We created a new Section Layout (“Chapter Heading Image”) that will be used for our chapter folders to insert our images.
- This layout doesn’t include the title or text or anything else (you can see that “Title”, “Metadata”, “Synopsis”, “Notes” and “Text” are all un-ticked for this layout).
- We added a “Title Prefix”, though. Title prefixes are normally (as you might guess) placed before the title. If there is no title, then the prefix appears on its own – which is what we want, because we only want to use the images for our titles.
- We used the <$img:…> placeholder to tell Scrivener that we want to insert an image into the title prefix. (You can see a full list of available placeholders by going to Help > List of All Placeholders…). Normally, you would place the name of the image in this tag. For instance, we could use <$img:ChapterOne> to insert the “ChapterOne” image. However, we want a different image for each chapter.
- We use the <$custom:…> placeholder to tell Scrivener to take the image name from the “Image” custom metadata field for the document (or folder) that is being formatted using this Section Layout. Remember how we entered “ChapterTwo” into the “Image” custom metadata field for “My Second Chapter”? That means that <$custom:Image>” for “My Second Chapter” will become “ChapterTwo” during Compile, and so “<$img:<$custom:Image>>” will become “<$img:ChapterTwo>”. And in turn that will get replaced with the “ChapterTwo” image, because that is what the<$img:…> placeholder does.
Right, time to test – but first we’ll need to assign our new “Chapter Heading Image”:
- Click on “Save” at the bottom right. Note that our “Stylish Ebook” Format appears in the list on the left and is selected.
- Take a look at our chapter folders in the contents list on the right. Note how they are assigned the “Chapter Heading” Section Type.
- Click on “Assign Section Layouts…”.
- Select “Chapter Heading” on the left – we just saw that this is the Section Type used for our chapter folders, so this is the one that we want to change to use our layout.
- On the right, select “Chapter Heading Image”.
- Click “OK”.
- Click “Compile”.
- Export the ePub file and make sure it opens in iBooks. Here’s what you should see:
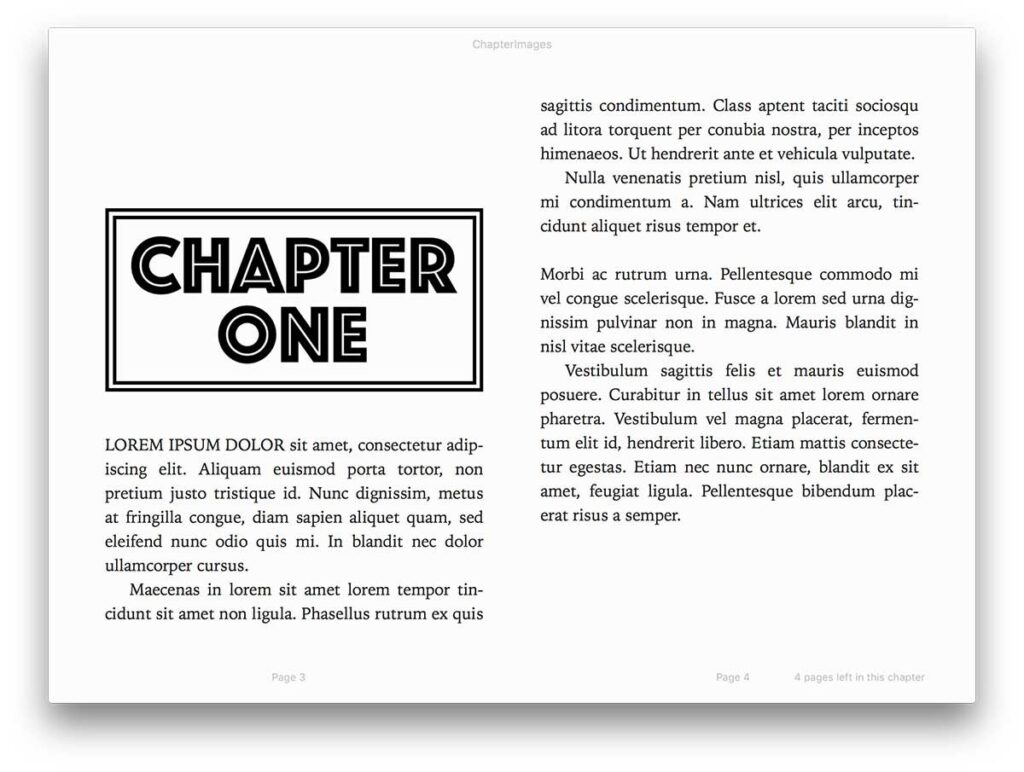
Not bad! There are two tweaks I’d like to make though:
- The title images are a little too big for my liking.
- I don’t really want the padding at the top of the page above my images.
Making Tweaks
For the images, I don’t want to edit and reduce the sizes of the image files themselves, but rather I just want to tell the ebook to show them at a smaller size. This way, the images will always be of a decent quality – much better than using smaller images.
Let’s fix the image size then:
- Go to File > Compile… again.
- Ctrl-click on “Stylish Ebook” in the Formats list and this time select “Edit Format…”.
- Make sure “Section Layouts” is selected in the sidebar.
- Select “Chapter Heading Image” in the Section Layouts list.
- Edit the “Title Prefix” so that it reads:
<<$img:<$custom:Image>;ebook=80%>
That additional “ebook=80%” (after the semicolon) tells the ebook to draw the image at 80% of the page width, which should be about perfect.

Next, let’s get rid of the top-of-page padding:
- Select the “New Pages” tab in the middle of the window.
Note that “Pad top of page with” is currently set to 6 blank lines. Change this to “0”.
Now test the changes:
- Click on “Test…”.
- Export the ePub and make sure it opens in iBooks.
This is the result:
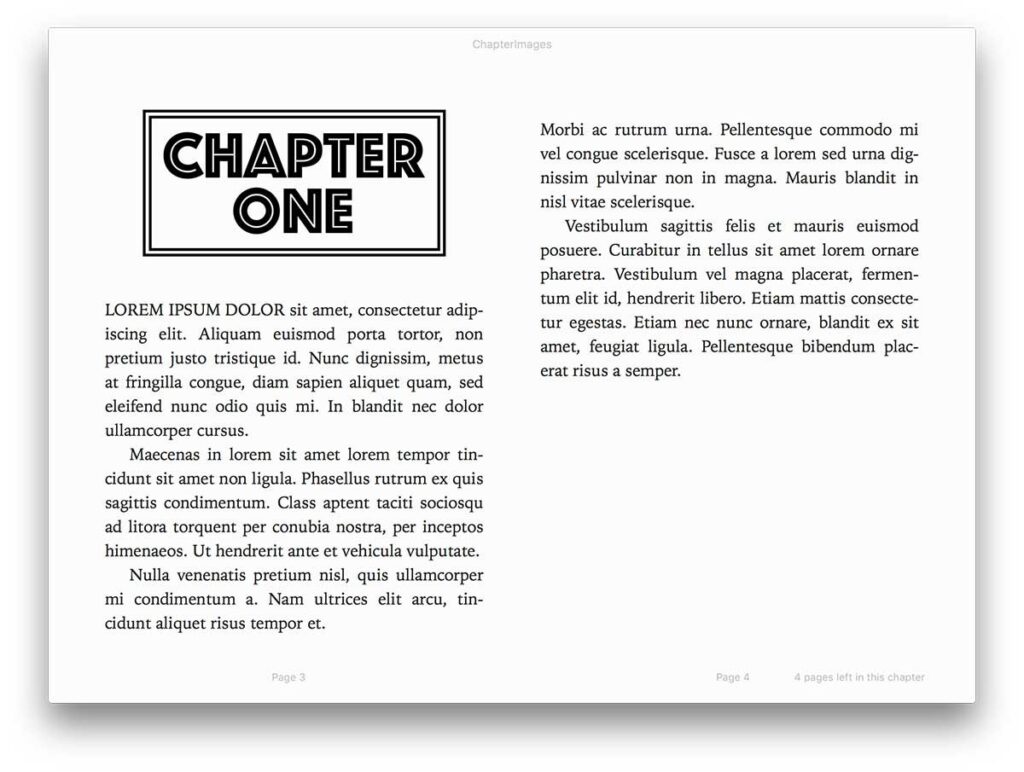
Perfect! Be sure to page through the book to check out the images used for the titles of the other chapters too.
But wait – if you flip back to the contents you will see an issue:

The contents is showing the title for each chapter as “ChapterOne”, “ChapterTwo” and “ChapterThree”, without a space between the words. What is causing this?
Fixing the Table of Contents
In fact, the cause is simple: if you select “Document Title Links” in the Compile Format editor sidebar, you will see that Compile is set to update titles in document links with the prefix and suffix settings, and this includes the table of contents links. This is good to an extent, because we want the chapter titles in the table of contents to match those shown at the start of each chapter, and not the ones we have typed in the binder necessarily. That is, for our book, we want the contents to show “Chapter One”, “Chapter Two” and “Chapter Three”, not “My First Chapter”, “My Second Chapter” and “My Third Chapter” as the folders are titled in the binder. But in our case, we are using images for the chapter titles. And because the titles contain nothing but images, Scrivener is using the names of the images in the table of contents.
So, the fix is easy: we just have to rename our image files.
- Click “Save” to save changes to our “Stylish Ebook” format.
- Hold down the Option key so that “Compile” changes to “Save” in the main Compile preview window and click on that to save our settings (not really necessary since we haven’t changed any settings outside of the format, but this is a good habit to get into).
- In the binder, under “Chapter Images”, rename the “ChapterOne” image to “Chapter One”.
- Rename “ChapterTwo” to “Chapter Two”.
- Rename “ChapterThree” to “Chapter Three”.
Remember that these image names are used in our “Image” metadata for our chapter folders, so we’ll have to update those, too:
- Select “My First Chapter” in the binder.
- In the Inspector, under “Image”, change “ChapterOne” to “Chapter One”.
- Do the same for “My Second Chapter” and “My Third Chapter”.
If you’re using images for titles in your own project, of course, this should be a consideration from the start: make sure you name the images with the chapter title.
One final check:
- Go to File > Compile…
- Click on “Compile”, export and open the ePub in iBooks.

Now things really are perfect – time to bask in the glory.
Final Words
I’ve gone into quite a lot of detail here, so let’s recap on the basics:
- Import the images you want to use for chapter headings into the project.
- Use a custom metadata field to tell each chapter which image it should use.
- If your chapter titles use images and nothing else, be sure to name each image using the chapter title as you want it to appear in the table of contents and other links.
- Use the <$custom:FieldName> placeholder embedded inside the <$img:ImageName> placeholder to tell Compile to insert an image based on the custom metadata value of a document or folder.
- Put these placeholders in the “Title Prefix” area of the Section Layout used for chapters.

