Customizing the Scrivener toolbar is an easy way to access the features you use regularly without clicking menus or remembering keyboard shortcuts.
How to Customize the Scrivener Toolbar
Scrivener has lots of features, and many of them are available by clicking a menu and choosing a menu item, or by using a keyboard shortcut if you know what it is. But you can also trigger many of Scrivener's features by clicking buttons in the toolbar, the bar with buttons at the top of the window. By default, Scrivener displays a set of toolbar buttons, but you can customize the toolbar to remove features you don't use and add buttons for features you use often. Here's how.
Why use the toolbar?
All apps today, on Mac and Windows, offer multiple ways to access and trigger features. You can click menus, press keyboard shortcuts, and click toolbar buttons. The quickest way to access many features is to use keyboard shortcuts. You may be familiar with some of the most common ones, such as Command-C (Mac) or Ctrl+C (Windows) to copy something, Command-X / Ctrl+X to cut something, and Command-V / Ctrl+V to paste.
You can save a lot of time by learning additional keyboard shortcuts for the features you use often, but you can't remember them all.
Clicking menus and menu items is great because you can access all of an app's features, but there are so many that you might forget where the ones you need are located.
If the features you use often have buttons in the toolbar, this can be an easy way to access them, because there are visual reminders of what these buttons do. And you can customize the toolbar on both Mac and Windows versions of Scrivener, to display the buttons for the features you use often.
You may want to add buttons for Targets, Annotations, or Comments, or a Focus menu (the v to the right of the button indicates that it opens a menu), to enable Focus mode by line, sentence, or paragraph.
Note that not all features offer toolbar buttons.
How to customize the toolbar on Mac
To customize the toolbar in Scrivener on macOS, right-click anywhere on the toolbar and choose Customize Toolbar, or choose View > Customize Toolbar.

When you do this, a dialog displays showing all the available toolbar buttons for Scrivener.

As you can see, there are dozens of toolbar buttons; to add any to your toolbar, just drag a button to the location where you want it to stay. To remove any toolbar buttons, drag them off of the toolbar onto the desktop. You can also rearrange toolbar buttons by dragging them around on the toolbar. When you have finished, click Done to save your changes.
You can use Spaces and Flexible Spaces to separate groups of buttons; just drag them to the toolbar. You can see spaces and how they work in the default button set at the bottom of the dialog.
Note that, at any time, you can drag the default set of toolbar buttons, which displays at the bottom of the Customize Toolbar dialogue, to the toolbar to reset these buttons to the default. You can also remove any button, at any time, by pressing the Command key and dragging the button to the desktop.
One other option, which you can see both in the first screenshot when right-clicking the toolbar, and in the Customize Toolbar dialogue, is to display icons with text, icons only, or text only. If you display icons only, you'll be able to fit more buttons on the toolbar. And if you have too many buttons to display on the toolbar, click the >> button at the right of the toolbar to display a menu with additional buttons.
You can also tweak what's visible in the Formatting Bar; see this article to learn how to change its options.
How to customize the toolbar on Windows
To customize the toolbar on Windows, choose View > Customize Toolbars. On Windows, you have access to two toolbars: the Main Toolbar, the one with buttons, and the Format Toolbar, the one where you can choose styles, fonts, and other formatting options. See this article to learn how to work with the Format Bar.
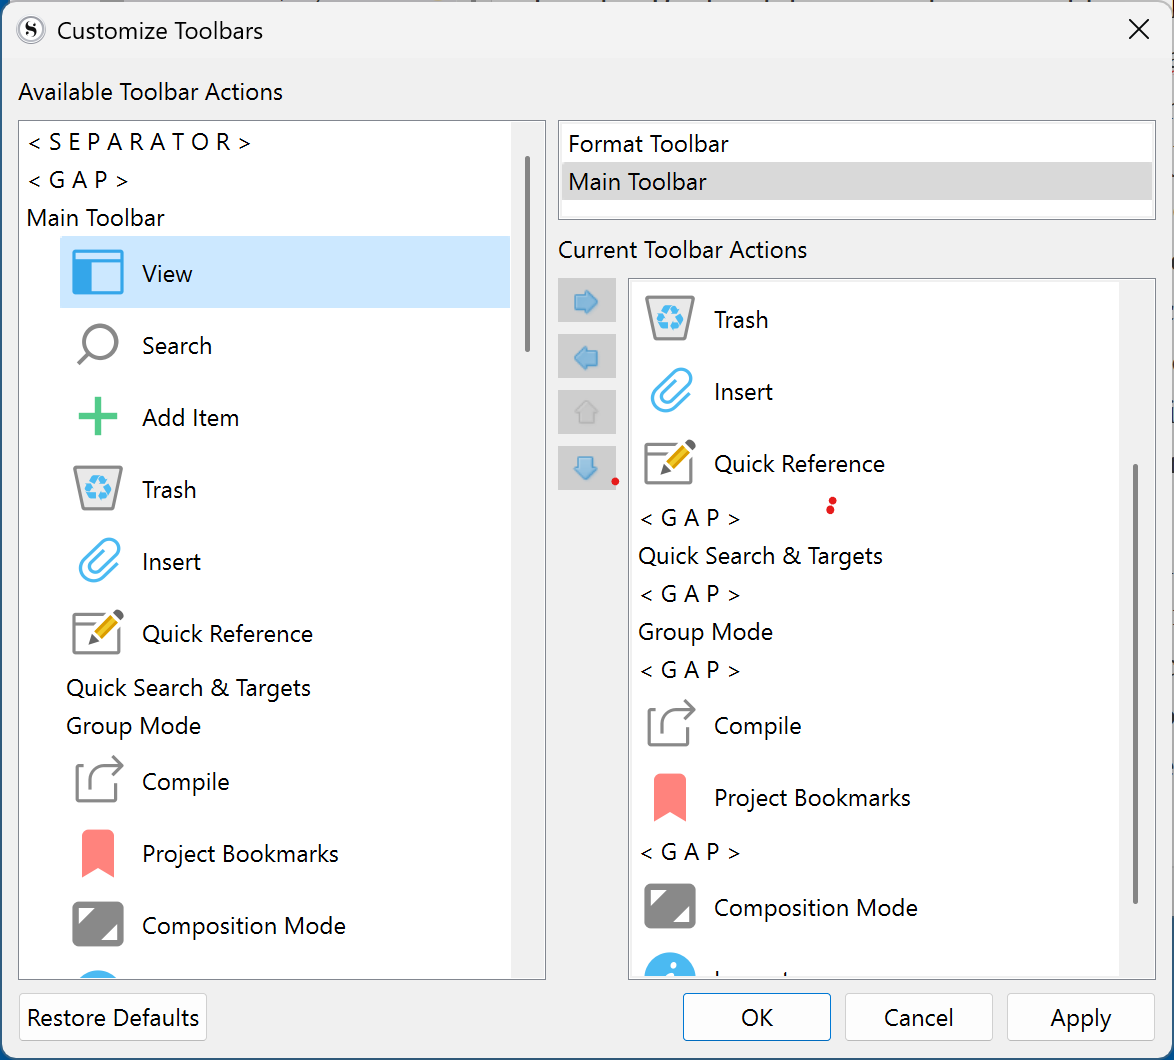
To customize the Main Toolbar on Windows, find a button you want to add in the list on the left. Click it to select it, then click the → button. To move it around among the current buttons, use the ↓ and ↑ buttons. To remove a button, select it and click the ← button. When you've finished making changes, click Apply.
On Windows, you can also add Separators and Gaps. Separators are vertical lines that help you see the difference between groups of buttons, and Gaps are spaces that allow you to separate buttons or groups of buttons. You can see that there are already a number of Separators and Gaps in the default button set, so you can see how they display in the toolbar.
If you have too many buttons to display on the toolbar, click the >> button at the right of the toolbar to display a menu with additional buttons.
If you want to reset the toolbar buttons to the default set, click Restore Defaults at the bottom of the dialog.
Have a look at the toolbar and see if there are any buttons that you don't use and any features that would be practical to have in the toolbar for one-click access. It only takes a few seconds to customize the toolbar, and it can save you a lot of time.
Kirk McElhearn is a writer, podcaster, and photographer. He is the author of Take Control of Scrivener, and host of the podcast Write Now with Scrivener.