Everything worked smoothly AmberV with the previous template!
Let me ask some more questions:
is it possible to add as a replacement for a new paragraph the “\par” command? I see that you have in the replacement tab “\” but doesn’t seem to work when compiling in LaTeX.
could you please provide more details on how we can cross-reference the items of the draft (i.e. chapters, sections, tables, equations, figures…)?
is it possible to link the font specifications (e.g. bold, underline, italics, colour, etc) of the Scrivener with the fonts actually produced in LaTeX?
how about having 2 or more pictures with the same caption and label? is there any short route for this feature?
I mapped line breaks (⌥⌘↩ or Insert ▸ Break ▸ Line Break) to the “\” code. That seemed a very safe assumption to make as a basic default to me. This type of line break is not a concept in raw text, it’s really only a word-processing convention as far as I’m aware of. So if one wants to break lines of verse or whatever without typing in the break points themselves, that’s a way of going about it. Perhaps I should remove it though, if it is confusing—the whole thing is quite unintuitive without a visible character code.
As for my mapping something to \par as a base default, I’m not sure what would work best there. What is shorter than the code itself that many might think to try without looking up? Perhaps I do not understand what you have in mind. I typically only ever use par inside my own commands.
Do you mean to more fully describe the compile settings that work together to create this effect? I could see that being useful, in case one doesn’t like autoref, or my “scrivauto” bookmark prefix. I’m not sure what else to say for front-end usage though. You make a document link pointing to the equation from your text—it’s no more complicated than that.
Only raw italics are handled specially, in that Markup compile format pane. Everything else must be style based. I’ve included a few examples, strong/emph/texttt—and pointed out how to make new environments in the help file.
That should be possible with both approaches as designed. How were you trying to do this? I gave it a quick test, both as two adjacent figures in a contiguous Figure style range, and as two figures within a “Figure” document type, the Layout’s prefix and suffix handles the overall environment and captioning. All the compiler does for the instance of the image itself is inject \includegraphics… Thus any place where it is valid to insert that code you can stick an image in Scrivener.
\begin{figure}[htbp]
\centering
\includegraphics[width=175pt,height=73pt]{800px-LaTeX_logo.png}
\includegraphics[width=176pt,height=217pt]{templates.png}
\caption{This is the caption for two images.}
\label{scrivauto:6}
\end{figure}
Thank you very much AmberV for your prompt and helpful replies!!
Labels:
My issues with labels are:
[*] I insert my figures in the main text and when I compile my draft in a LaTeX editor, the label numbers they get are the same with label of the section they live in. For example, I have two or more figure in a section labeled as “\label{id9}” and all the figures in this section are labeled as “\label{id9}”. Is that normal?
Following your template, I tried to create a similar to “Figure” paragraph style for Equations and Tables. Again when I am compiling the document the labels have the same id number with the section that they belong.
Finally, I get that you made label numbers produced automatically by Scrivener for every object. My questions is, let’s say that while I am writing some text in the editor, I want to refer to one figure/equation/table that either is included in the current section or in another section/subsection/chapter in my Draft. Since the label id numbers are not known to me, which are the steps I should follow to refer to them while I am writing in Scrivener?
The steps that I followed to create “Equation” and “Table” environments are: File → Compile → Edit Format → Styles → add new style → set Prefix/suffix as shown below.
[list]
and then I go back to the main editor, press the styles button in the format bar and add the styles having the same name as the those created in the previous process. I have also added a highlight box so as to see where exactly is the in-text position of those objects in.[/:m]
[] Fonts:
Some of the font styles that are regularly used are: bold (\textbf{…} in LaTeX), italics (\textit{…} in LaTeX), underline (\underline{…} in LaTeX). Could you please explain which are the steps to create those font formats and include them in the Styles Panel in Scrivener’s Format Bar for ease of use?[/:m]
[] Comments: Although I have “soul” package loaded, the comments are not included in the LaTeX document. Furthermore, another useful feature that may be included to add to-do notes/comments in the final output is loading the LaTeX commands shown in the second answer in the following forum and work for the article document class: https://tex.stackexchange.com/questions/9796/how-to-add-todo-notes,
Do you think that it is possible to combine the two techniques? For example, make a comment in Scrivener (Insert → Comment) and then include the commands shown in the link above (i.e. \info{…}) in the comment text of Scrivener?[/:m]
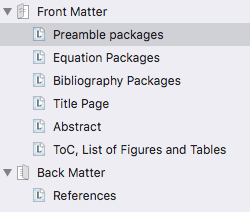
[] Preamble and Packages: After spending some time with your template, I think that loading all necessary packages in separate binder documents is much more convenient. So I moved all Packages and LaTeX Commands from the “Text Layout” (except for Document prefix: \documentclass[11pt, a4paper]{article} and Document suffix: \end{document}) pane and put them in my Binder (see attached image). [/:m]
[] References: For bibliography, I use the “References” document in the “Back Matter” and just type the style that I want and the name of my .bib file. \bibliographystyle{apalike}
\bibliography{name_of_bib_file}[/*:m][/list:u]
It doesn’t seem to blow anything up if I try it in LaTeX, but as for whether or not that is best practice, or if it is better to use subfloats—that isn’t something I’ve ever had to do any research into. The WikiBook page on figures seems to go over a good many options.
That aside, where it comes to the usage of this template and the “Figure” section type: if you want a separate caption and label for each figure then each figure should be in its own document. And if you need additional structure to create subfloats or whatever, I think it would work fine to put that structure into the Figure document type. Since all it does is wrap the entire thing in a basic figure environment, you can then add whatever level of detail within it you require.
And if you’re using the style-based approach, just make sure your styles terminate between figures, that the empty line between them is set to “No Style” and not “Figure”. Use of a style background highlights is good for stuff like this, as you note. You can see right where a semantic block begins and terminates.
The style-based approach is going to be useful if you want to declare your own labels, and you could do that with the provided label style (which itself only inserts the label code, so that can be entered into the editor wherever it is valid to insert \label{…}; in a table, after a heading, etc.).
The automatic labelling, on the other hand, the sort you find with the Figure document type is purely section based. There is no way to generate additional <$linkID>’s for a single chunk of text. That is why your style-based uses of that placeholder do not work properly. I don’t know what your goal is with this style, but in case you are not aware, the use of <$custom:Caption> inside the style prefix may also not work to your benefit. That refers to the current document’s field value in the inspector—thus you could only have one such usage of this style per document. Or to put it another way, all tables in this document would use the same caption with the way you have the style set up.
In short, it would be better to copy from my example of style-based figures for a style-based equation, than to copy from the Section Type approach and try to apply that technique to styles. They use different mechanisms for a reason.
That’s what I referred to earlier as making a document link pointing to the section you wish to refer to. If you look in the Markup compile format pane, you see that internal document links have a suffix appended to them to generate an autoref code using the establish <$linkID> for the target item as the bookmark. Thus you don’t have to know the number. You just select some text and hyperlink it to the right section.
If you want to assign your own labels and refer to them by hand, then this approach probably isn’t the best. I would probably swap out all of the <$linkID> stuff from the Layouts and replace them with a custom metadata field for holding the section’s label. Then I’d remove the suffix from the Markup compile format pane. Document links themselves would cease having any functional impact on the output, leaving the particulars of cross-referencing entirely up to you.
I tried to find a way to make this a little more flexible—perhaps assigning an serial number label for internal usage as I described, with Document Links, but also allowing for one to create a custom label they could easily use with raw syntax or other methods elsewhere. I couldn’t find anything for doing that with LaTeX though—essentially having aliased labels, so that one cross-reference can point to “scrivauto:331” and another can point to “mysectionname” and both links resolve to “Section 23.8” and link to the same object. If anyone knows how to do that, or what package would make it possible to do so, I’d appreciate pointers.
I would use the rich text features to make the text look how I want it represented in the editor—that part is entirely down to your aesthetic choice (though keep in mind that by default italics will be converted, so avoid that formatting unless you mean it, or if you don’t want to mean it, remove the syntax from the Markup compile format pane).
Create a new style from the example text, set to character attributes only and any other features you prefer.
In the Styles compile format pane, select the Emphasis example I provided and click +.
Modify the command name in the prefix/suffix as necessary.
Comments and inline annotations are by default stripped out of the compiled document as a global default, no matter the format you are using—the format only defines how comments are treated if they are included. Make sure they are, in the compile overview area, under general options.
Yeah that’s probably going to be a choice everyone makes for themselves. What I’m trying to promote, in the way it is set up by default, is the concept that the Format is fully responsible for those aspects of the preamble that determine the overall look and basic function of the document. Those things that are particular to the document regardless of its presentation are better handled in the project itself. This way the format can be globally applied to many projects, and projects can easily switch between publication standards without breaking.
Here are two examples for how I think of it:
If I want to change how bullets look, I would put that in the Text Layout pane. It’s not going to break my project if I switch do a different Format, it will merely change how the itemisation looks when I compile.
If I write a custom environment like \callout and use packages and configuration to make that call-out box, then all of that is something that the document itself needs to remain functional and not throw errors if I switch up the document class or paper size. So for that I’d make an entry in the front matter folder and call it “Call-Out Boxes”. It’s a nice little compartmentalised package I can drag and drop into future projects as well, if I want.
I suppose another way of looking at it would be that if one were inclined to use \inputs in their preamble to make cross-publication easier then that’s the sort of scenario where delegating things to the Format might be a better approach. If one need only format for one publication, then the convenience of having the whole document essentially in the binder is undeniable.
I wish that I could add post-processing script to it, seems arbitrary that only mmd/pandoc route has that option. Any hope for post-processing with text too?
Thanks Nontroppo, I missed that (thinking I wasn’t using any markup or markdown)!
I also solved it another way by removing the automatic hyperlink, creating and applying a URL character style and adding a prefix
\url {
and suffix
}
Neat. I like the new styles, section types and the rest. And the modular way you can build LaTex Controls.
Thanks again, Ian
We’re using the word “markup” in its broader definition here, for this pane, where even LaTeX itself falls under the scope of being markup.
The plain-text mode will be getting access to the Processing pane in the next update. So you would be able to, among other things, graft a mklatex or pdflatex workflow into the compile settings and end up with a PDF instead of a .tex file, if you want.
I’m using AmberV’s template with LaTex output. I’m generally quite happy. Have been relearning LaTeX which I haven’t used for about 15 years.
I’m writing an actual memoir (for the family) with a lot of figures.
There is one problem that I haven’t been able to reproduce with a simple example. But it seems that when I move figures around or retitle them in the referenced document, Scrivener remembers what was there before when recompiling unless I close the project and re-open it. The latest issue was that I had changed the name of the image in the linked file, and re-inserted it, but then when compiling the image I had reinserted wasn’t in the compiled folder (which normally includes the LaTeX source and all the figures that were inserted).
When I closed the project and reopened I got the right figure.
I’m using
insert -> image linked to file
I hope this is clear enough. I will try some more to get a simple but complete example of the problem.
Another thing to pass on – not a problem, but an obseration:
I have found that I won’t be using the Figure style as (1) I’m not always happy with the [htpb] option set, and (2) I have decided to put in figure labels. Possibly this could be done with the Figure Style, but I personally don’t mind simply typing \begin{figure} \centering… \end{figure}. Could even do this with text replacement instead of a style, I guess.
Also, I’m using wrapfig.sty quite a bit. I tried putting in a style for that when I was starting out but abandoned that effort for similar reason – in fact there were even more custom options per figure!
Thanks for the template. Other than the problem I seem to be having that requires closing the project and reopening it every now and then I am very happy with it.
Just a guess, but you often need to LaTeX a file twice to get the correct output; it’s possible the template isn’t doing anything wrong. You should be able to tell by looking at the LaTeX output, or by running LaTeX again on the initial output without reopening the Scrivener project.
Or you might also be describing Scrivener, and how it works with linked images. When you first click on a section in the binder that has linked images, it will load and cache the images from the disk, displaying a thumbnail in the editor for your convenience. If the image later changes on the disk during that session, then the software will not react to that change because it is loading from fast cache rather than going back to the original (potentially large and slow) files on the disk every time.
You can manually force a cache update without reloading the software, by right-clicking on the image and using the “Reload from Original Image” ccontextual menu command (which will also reset the dimensions to what is on the disk, and thus something to make a good habit of doing if you change image sizes externally).
You can change that and any other style output (and well, everything for that matter, the whole thing is built from Blank, so what can be built can be unbuilt ). Search for “Figure Customisation” in the help file for more info—but the basic idea should be self-evident by going through the various styles in the Styles compile format pane.
For labels, that is what the Label style is for. It’s usage is illustrated in the example figure a few paragraphs above the customisation documentation. Using styles to mark stuff like labels is pretty nice, because you can use that Edit ▸ Find ▸ Find by Formatting… tool to look specifically for styled text. If you don’t remember precisely where an figure is that you want to refer to, you can scan for it more easily that way.
Well yeah… it really does depend on what you need and whether it makes sense to abstract a thing into a Section Layout or Style. The main thing I want to illustrate with the template is that you can, and provide practical examples for how that could be done. For example with wrapfig, you could take the example of how I insert a \caption in the “Figure w/ Caption” Layout, where in the Suffix tab we have:
This takes the contents of the “Caption” custom metadata field in the inspector sidebar for that figure and insert it into the syntax. Taking that same principle, one could create additional (even multi-choice lists) metadata, and have in the Prefix tab:
Or you could have a field to type in the width into the sidebar, or even manage a way to use regular expressions and somehow get the natural width of the image into that spot. And you could move the Label over to custom metadata as well, instead of going with my auto-generated example in the Suffix. Having the label as a custom field adds the benefit of being able to add it as a column in the outliner, making lookups extremely simple:
Project Search for section type “Figure” (possibly saving that to a saved search collection).
In the Outliner, Cmd-F and search for the figure by name or caption.
Copy the label you want and return to where you were to paste the cross-ref.
To my mind it’s all about exposing data to organisational features where it makes sense to. If someone isn’t adding dozens of cross-references on a daily basis, that workflow would be overkill. But the idea behind that workflow might be used to augment some particular thing you do a lot of that is entirely different.
And like you say, often it is easier to just type it in or use Replacements—this template is designed after all for those that don’t mind and maybe even like writing in LaTeX. I’m not sure if I would want to encapsulate wrapfig like that either, or have to look up and type in stuff into the inspector every time. Just wanted to point out what is possible, if one were inclined.
With Scrivener 3.0.3 available, this template is now included in the base install, under the Non-Fiction category. Thanks to everyone that helped test it and provide feedback!
Thanks AmberV for your very thorough response to my somewhat muddled question. Since posting I had read about Scrivener’s caching mechanism and had decided I had run afoul of that, but your reply really helped clarify it for me, And I the other info you included is very helpful .
Unfortunately that template is going to be of no use to you at all on Windows, sorry to say. It depends heavily upon 3.0 level features, not all of which are yet implemented in even the beta version of Windows.
Your best bet right now will be to use the MultiMarkdown based approach in your current version, or to simply compose LaTeX directly into the editor, as many have done, and compile to plain .txt, changing the extension.
The General Non-Fiction (LaTeX) template in Scrivener 3 is super helpful. Thank you for that.
Would you be able to share the project for the version you used to create the Sample PDF embedded therein? I’m new to Scrivener and even that little bit more detail would be helpful.
And, do you have some directions on the basics? E.g.: I’m familiar with LaTeX but how do you create the equation that gets inserted into the binder? Then how do you add that within the text? Can you view/edit the LaTeX code for an equation from within Scrivener?
The project comes with a few example document templates that are set up to work with compile out of the box. To create an equation item in the binder, use the Project ▸ New from Template ▸ submenu to select one of the equation options. The difference between the two is that the standard “Equation” type comes with a LaTeX label. You can reference the equation from elsewhere in the text by dragging the binder item into the editor, causing Scrivener to create a hyperlink to the equation. It will generate the autoref and match the label for you.
Not sure what you mean—but in case it isn’t clear, it’s just a text file in the binder. Granted, it’s a type of text item, set up to format the contents as an equation, but what you type into it will be printed into the output like all of the other text items you add to the binder. This is perhaps a little more straightforward than you may be thinking.
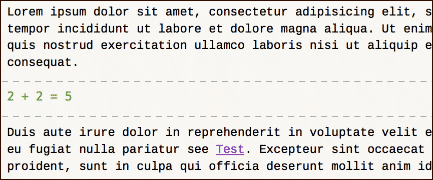
Put it this way, if you type “2 + 2 = 5” into an equation binder item, and it is between two chunks of text, then if you select those three items in the binder and view them as Scrivenings, you’d see:
[size=80][/size]
That’s what you see and what you work with while writing. The “Test” hyperlink by the way is pointing to the equation binder item (called “Test” in the binder). However when this is all compiled, you get:
[code]Lorem ipsum dolor sit amet, consectetur adipisicing elit, sed do eiusmod tempor incididunt ut labore et dolore magna aliqua. Ut enim ad minim veniam, quis nostrud exercitation ullamco laboris nisi ut aliquip ex ea commodo consequat.
Duis aute irure dolor in reprehenderit in voluptate velit esse cillum dolore eu fugiat nulla pariatur see Test (\autoref{scrivauto:7}). Excepteur sint occaecat cupidatat non proident, sunt in culpa qui officia deserunt mollit anim id est laborum.[/code]
The Section Layout assigned to “Equation” binder items will insert the stuff around the equation itself, including the automatic label, which will be used by the link to create an autoref.
 [/:m]
[/:m]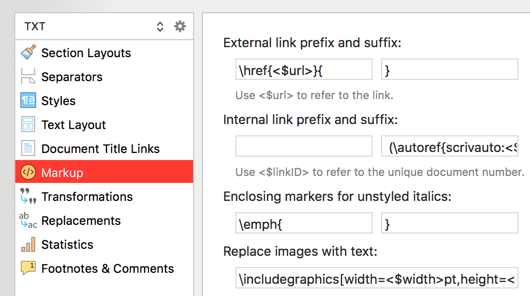
 [size=80][/size]