Scrivener automatically saves your projects, but if you want to save a copy of a project, you need to be careful.
Saving Scrivener Projects
When you work in most apps, you need to save your work, to ensure that it gets written to disk. This is especially important when you're creating something, such as writing an article or book; you can't easily reproduce your work if you don't save it. If you don't regularly save your work, you may lose it if your computer crashes or if your battery dies.
Saving is one of the more basic features in an app like Scrivener, but there are a few things to know about how Scrivener automatically saves your work, and what happens when you choose Save As from the File menu.
In this article I'll tell you about auto-saving Scrivener projects, using Save As to create a copy of your project, and some other information about saving and duplicating files.
Saving Scrivener projects
If you've been using computers for a long time, you probably have the reflex to press Command-S (Mac) or Ctrl+S (Win) frequently. For me, it's almost automatic. When I finish a paragraph, my muscle memory kicks in, and I save my file.
But with Scrivener, you don't need to do this. By default, the app automatically saves your projects every two seconds. You can tell when a project has not yet been saved; on a Mac, the red close button in the tool bar has a black dot in it; on Windows, the name of the project in the title bar has an asterisk after it. But you'll have to be attentive to spot this: since Scrivener automatically saves your projects every two seconds, you won't see these marks very long.

You can adjust this time if you want. Go to Scrivener > Preferences on Mac or File > Options on Windows, click the General icon in the toolbar, then click Saving in the sidebar.
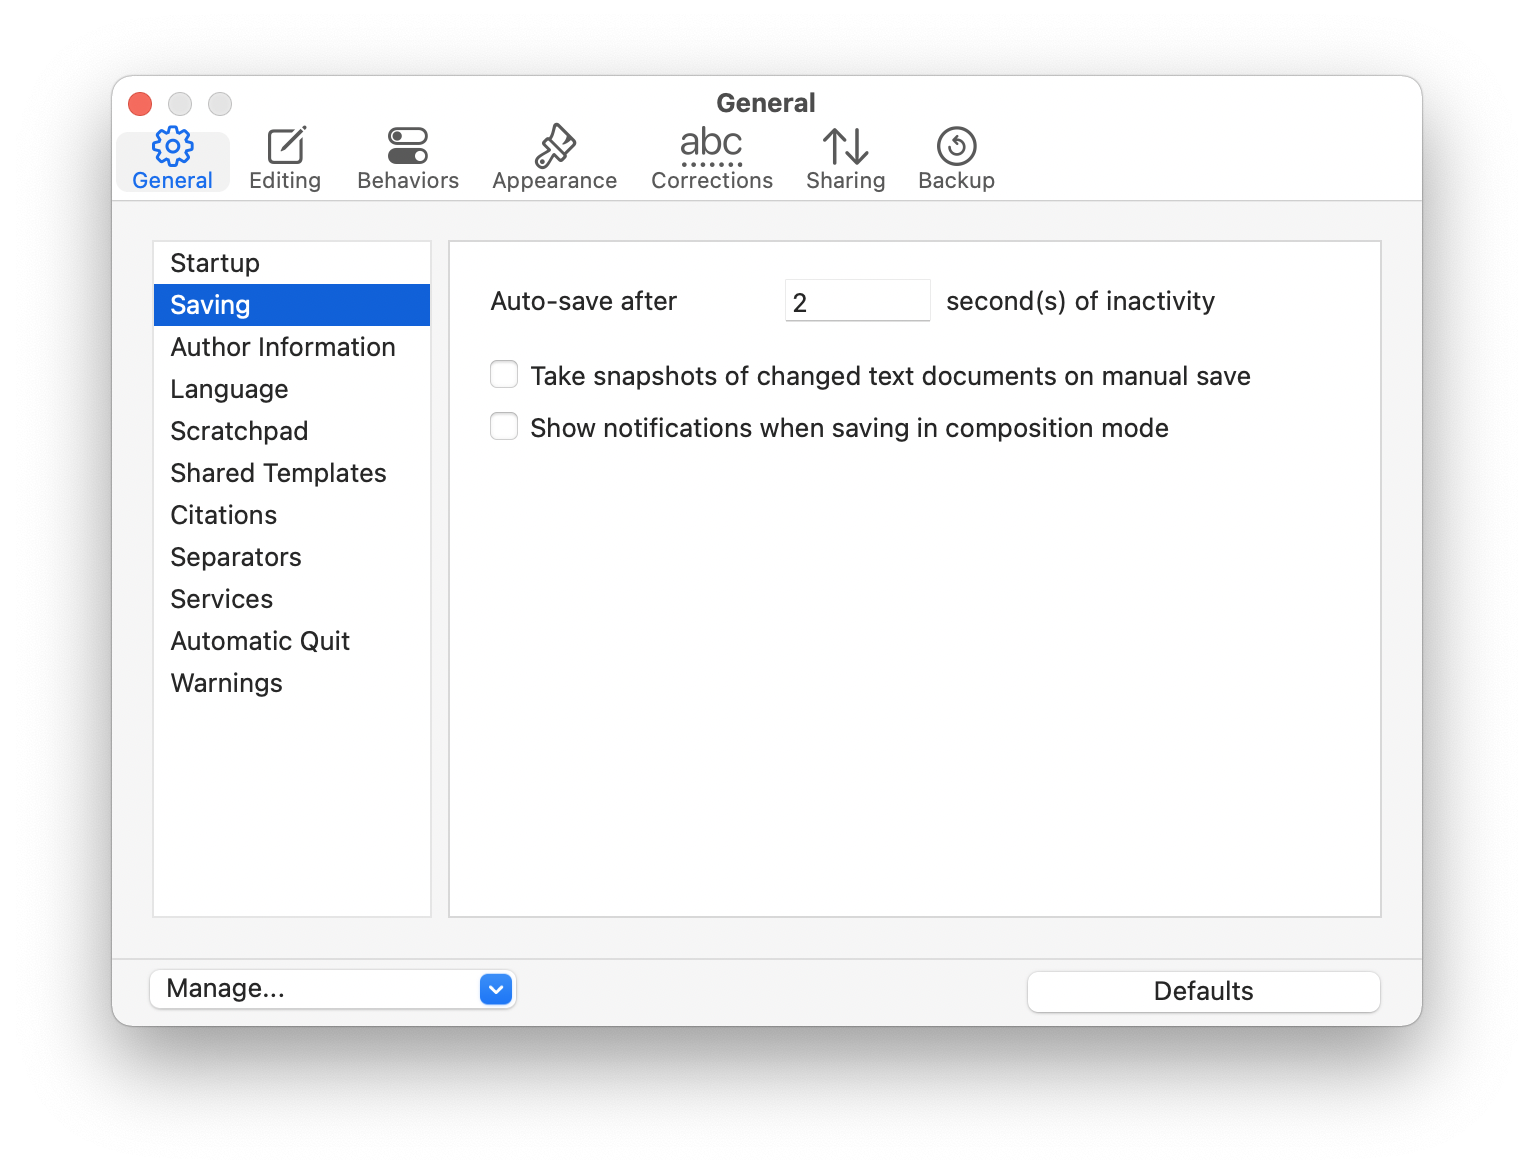
You can increase the time here if you want, but there's no reason to do so, unless the frequent saving causes problems with your computer. If your project is very large, and your computer's drive isn't very fast, saving the project that often may affect performance.
Save As
In the File menu, on both Mac and Windows, there is a Save As command. This is essentially a way to duplicate a file, and is standard for any app that works with files. Scrivener is no different: you can select File > Save As, and make a copy of your project.
However, you need to be aware of what happens when you do this. When you choose Save As and save a file, the new file becomes the active project. This means that you shouldn't use the Save As command to make a copy of a project, such as if you want to put it on a cloud storage service, or share it with someone, if you plan to continue working on the file. If you don't pay attention, you may continue to write in the copied project, and not have the changes in your main project.
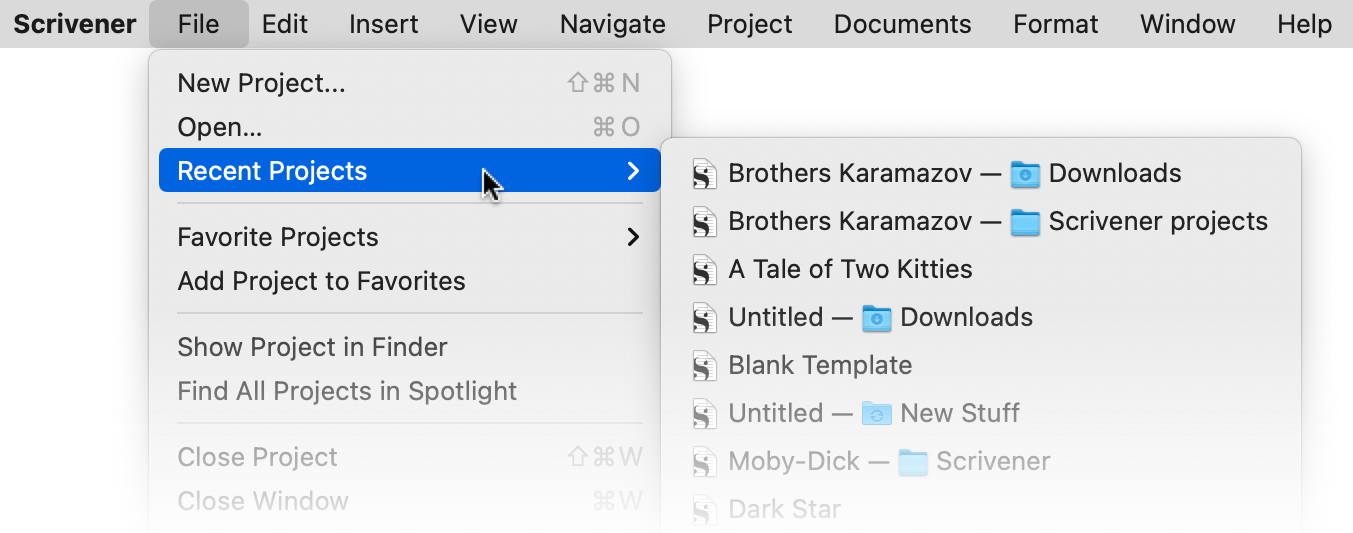
With Scrivener on Mac, you can see this in the File > Recent Projects menu. If there are two or more projects with the same name, Scrivener shows where each project is located. In the example below, I opened my Brothers Karamazov project that was in my Scrivener Projects folder, selected File > Save As, and saved a copy to my Downloads folder. But that is now the most recent project, the one that is still open.
You won't see these file paths in the Windows version of Scrivener, but if you do see the same project listed twice in the File > Recent Projects menu, make sure you choose the correct one to open.
Duplicate Scrivener Projects
Some people make regular copies of their Scrivener projects. For example, you may have a backup routine that involves uploading a copy of the project to a cloud server, and you want to have an exact copy of your project both in the folder where you keep your current files, and in the Dropbox, OneDrive, or iCloud folder on your computer.
There are two ways to duplicate Scrivener projects. The easiest is to just use the built-in tools on your computer. On Windows, right-click on your Scrivener project, choose Copy, then navigate to the location where you want to save the duplicate, then right-click and choose Paste.
You can do the same thing on a Mac, but you can also choose Duplicate from the contextual menu when you right click, and, if your project is named My Novel, the Finder names the duplicate My Novel Copy. You can then drag that copy to another location.
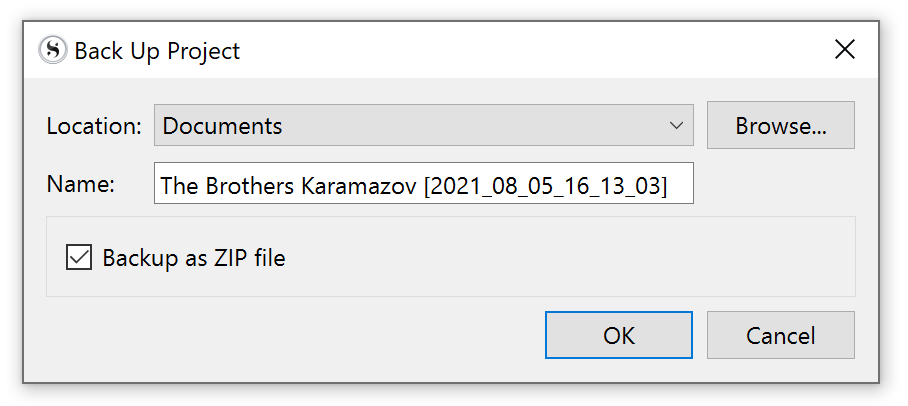
Another method is to use Scrivener's backup tool. Not the automatic backup feature, which I explained here, but if you choose File > Back Up > Back Up To..., Scrivener saves a copy of the project in the location of your choice. Scrivener conveniently includes the date and time of the backup, and lets you save it as a zip file, if you want to save space.
So you could, every day - or even several times a day - make a manual backup of your project to a cloud folder, and each file would show the date and time of the backup. With this method, you don't have to worry about replacing or overwriting an existing copy of your project, since the name is always different. And if you need to use one of these backups, you'll be able to see which is the most recent.
So make sure you save your Scrivener projects correctly. Auto-save, save as, and backups can ensure that your projects are always available.
Kirk McElhearn is a writer, podcaster, and photographer. He is the author of Take Control of Scrivener, and host of the podcast Write Now with Scrivener.